Pita Recipe
Dreaming about making pitas at home for ages or just driven by a sudden impulse to glorify the day? These pita breads will please both!
As I currently have some time, I was surfing on the web yesterday. In search of new, intriguing thoughts, inspirational meals that I’ve never tested before, to surprise my loved ones with. Looking for quite some time but couldn’t discover too many interesting stuff. Just before I wanted to give up on it, I came upon this yummy and simple treat by chance. It seemed so tempting
on its photo, that called for rapid action.
It had been not difficult to imagine how it is created, how it tastes and how much my hubby might love it. Mind you, it is extremely easy to keep happy the man in terms of treats. Yes, I am a lucky one. Or maybe he is.Anyhow, I visited the page: Suncakemom and then followed the step by step instuctions that have been coupled with great shots of the process. It really makes life much simpler. I can suppose it’s a slight inconvenience to take snap shots down the middle of cooking in the kitchen because you ordinarily have gross hands and so i really appreciate the effort and time she put in for making this post .
With that in mind I am inspired presenting my own formulas in a similar way. Appreciate your the concept.
I was tweaking the main mixture to make it for the taste of my family. I have to mention it had been an incredible outcome. They prized the flavor, the structure and enjoyed getting a sweet like this in the midst of a lively week. They ultimately requested lots more, many more. Hence the next occasion I’m not going to make the same mistake. I’m going to multiply the amount to make them pleased.
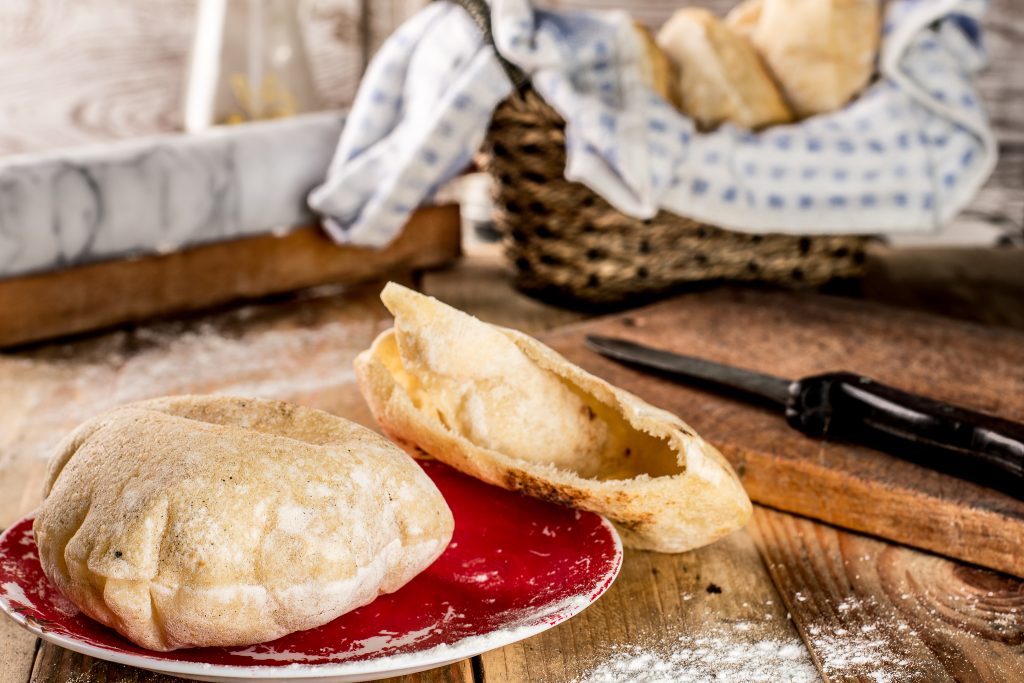
This Pita Bread is from SunCakeMom.
Starter dough
Mix water, flour and a bit of fresh yeast in an airtight container. Close the lid and put it in the fridge for 6 hours. This step is optional and can be skipped entirely.
Pita dough
Measure flour, yeast, salt, olive oil and water. Add dough starter too if used.
Knead it together until a uniform sticky dough forms. We need to have a relatively moist somewhat sticky dough.
Lightly rub the dough with oil to prevent it from drying out.
Cover it then place it to a 68°F – 81°F /20°C – 27°C corner to rise for about 45 – 90 minutes. With a bit of luck and right temperature, it will double in size.
Take the dough out, cut it in two then gently form two logs out of them. Try not to press much air out of the dough. This step is only necessary to help us make similar pitas. If size is not important, this step can be skipped.
Cut up the dough into equal pieces. Our favorite size is about 2 oz / 60g.
Roll them gently into balls. In doubt how to roll the dough? Check out: How to roll bread roll No.1
On a heavily floured surface roll them out into 6″/ 14 cm diameter discs. Make sure they don’t stick while rolling them out.
Place the rolled out discs onto a floured surface. Optionally sprinkle some water on top to prevent them to dry out, cover them with a kitchen towel then place them to a 68°F – 81°F /20°C – 27°C corner to rise for 30 minutes.
Not many of us is capable to shovel down 20 pitas in a day. Rub oil on the unused dough and in an airtight container, put them into the fridge for another day.
Heat up a non-stick or even better cast iron skillet medium to high. Too high temperature will scorch the pita creating holes where the water vapor can escape instead of puffing up our pitas. Place the pita upside down onto the hot skillet. In about 30 – 60 seconds bubbles should appear on the top of the dough.
We should be good to flip the pita over. When we try to lift the pita with a spatula and feel resistance, carefully try to separate the dough from the skillet without tearing. Consider lowering the heat or sprinkling flour on top of the dough before flipping it into the skillet.
With a bit of luck our dough should start puffing up in 1 – 2 minutes.
If it doesn’t puff up, try to find the hole where the vapor escapes and pressing on it with the spatula. It won’t be perfectly round but it will be just as tasty as the others.
Place the pitas under a kitchen towel until serving to prevent them from drying out.

Recent Posts
- Broccoli Fritters
- Chocolate Ganache
- Rutabaga Fries
- Keto Raspberry Jello Eggs
- Puff Pastry Recipe Dessert
- Baked Brie
- Kielbasa Sausage Recipes
- Recipe For Strawberry Tart
- Noodle Soup
- Strawberry Lemonade Pound Cake
- Puff Pastry Recipe Dessert
- Fried Cabbage Bacon And Onion
- Buttercream Frosting Chocolate
- Roasted Carrots And Potatoes
- Sausage Rolls
- Fish Chowder Soup